How to Turn GPT Image 2 Storyboards into Cinematic Videos with Seedance 2.0
TL;DR
The fastest way to create a cinematic AI video is not to start directly with text-to-video.
A better workflow is:
- Use a GPT Image 2 Generator to create a complete cinematic storyboard board.
- Use that storyboard as a visual reference inside a Seedance 2.0 AI Video Generator.
- Let Seedance 2.0 turn the storyboard into a 15-second cinematic video with consistent characters, camera movement, lighting, and scene flow.
This GPT Image 2 + Seedance 2.0 workflow is powerful because it turns a loose idea into a structured video plan before the video is generated.
Instead of asking an AI video model to imagine everything from text, you first create a visual production board with GPT Image 2. Then Seedance 2.0 follows that board and turns it into a cinematic video.
If you want to create Hollywood-style storyboards with GPT Image 2 + Seedance 2.0, this guide will show you the full workflow, the prompt structure, the Seedance 2.0 video prompt, and the common mistakes to avoid.
Why This Workflow Matters Now
AI video generation is getting better very quickly.
But there is still one big problem: control.
You can write a simple video prompt like:
A futuristic woman walks through a neon city and discovers a hidden robot army.
The result might look interesting. But it may not feel like a real cinematic sequence.
The character might change between shots. The camera might move randomly. The lighting might shift too much. The story may not have a clear beginning, middle, and ending.
That is why storyboard-first video generation is becoming so useful.
Instead of asking an AI video model to invent the entire video from text, you create a visual plan first.
That visual plan becomes the guide.
GPT Image 2 creates the cinematic storyboard. Seedance 2.0 brings it to life.
This is the core of the GPT Image 2 Seedance 2.0 cinematic storyboard video workflow.
The Problem with Direct Text-to-Video Prompts
Most creators start with direct text-to-video prompts.
They open a video generator, type a short scene description, and hope the model understands the entire video.
Sometimes it works.
But often, the output feels unstable.
Here are the common problems:
- The character does not stay consistent.
- The environment changes between shots.
- The camera movement feels unplanned.
- The video lacks a clear shot sequence.
- The final result feels like a random clip, not a cinematic trailer.
- The model may focus on surface-level beauty instead of storytelling.
This is not always because the video model is bad.
It is because the input is too vague.
A cinematic video is not just one scene. It is a sequence of decisions.
You need character design, environment design, camera direction, lighting, pacing, mood, and visual rhythm.
A simple text prompt usually cannot control all of that well.
Why Storyboard-First Video Generation Works Better
A storyboard is a visual plan for a video.
It breaks the video into key shots.
For example, a 15-second cinematic video can be divided into six cuts:
- Wide establishing shot
- Character introduction
- Close-up discovery moment
- Dynamic action or turning point
- Suspense or reveal shot
- Final dramatic hero shot
This structure gives the video a real cinematic rhythm.
When you use GPT Image 2 to create a storyboard board, you are not just making a pretty image. You are creating a production plan.
That plan can include:
- Character reference
- Costume details
- Environment design
- Camera plan
- Floor map or set layout
- Lighting notes
- Color palette
- Mood tags
- Six storyboard panels
- Shot timing
- Cinematic captions
Then you upload that board into Seedance 2.0 and ask it to follow the visual reference.
This gives the AI video model a much stronger foundation.
That is why the GPT Image 2 + Seedance 2.0 storyboard to video workflow can produce more structured and cinematic results than direct text-to-video prompting.
What Is the GPT Image 2 + Seedance 2.0 Storyboard to Video Workflow?
The workflow is simple:
First, you create a storyboard image with GPT Image 2.
Then, you use that storyboard image as the reference for Seedance 2.0.
In practice, the process looks like this:
- Choose a cinematic concept.
- Use a GPT Image 2 AI Image Generator to generate a professional pre-production storyboard board.
- Review the storyboard and make sure the character, environment, and shot flow are clear.
- Upload the storyboard into a Seedance 2.0 AI Video Generator.
- Use a short prompt telling Seedance 2.0 to follow the storyboard.
- Generate a 15-second cinematic video.
- Review, improve, and regenerate if needed.
The key idea is this:
GPT Image 2 creates the plan.
Seedance 2.0 creates the motion.
That is why this workflow is so practical for creators who want more control over AI video generation.
The Core Idea: GPT Image 2 Creates the Plan, Seedance 2.0 Creates the Motion
Think of GPT Image 2 as your AI storyboard director.
It helps you design the visual world before the video exists.
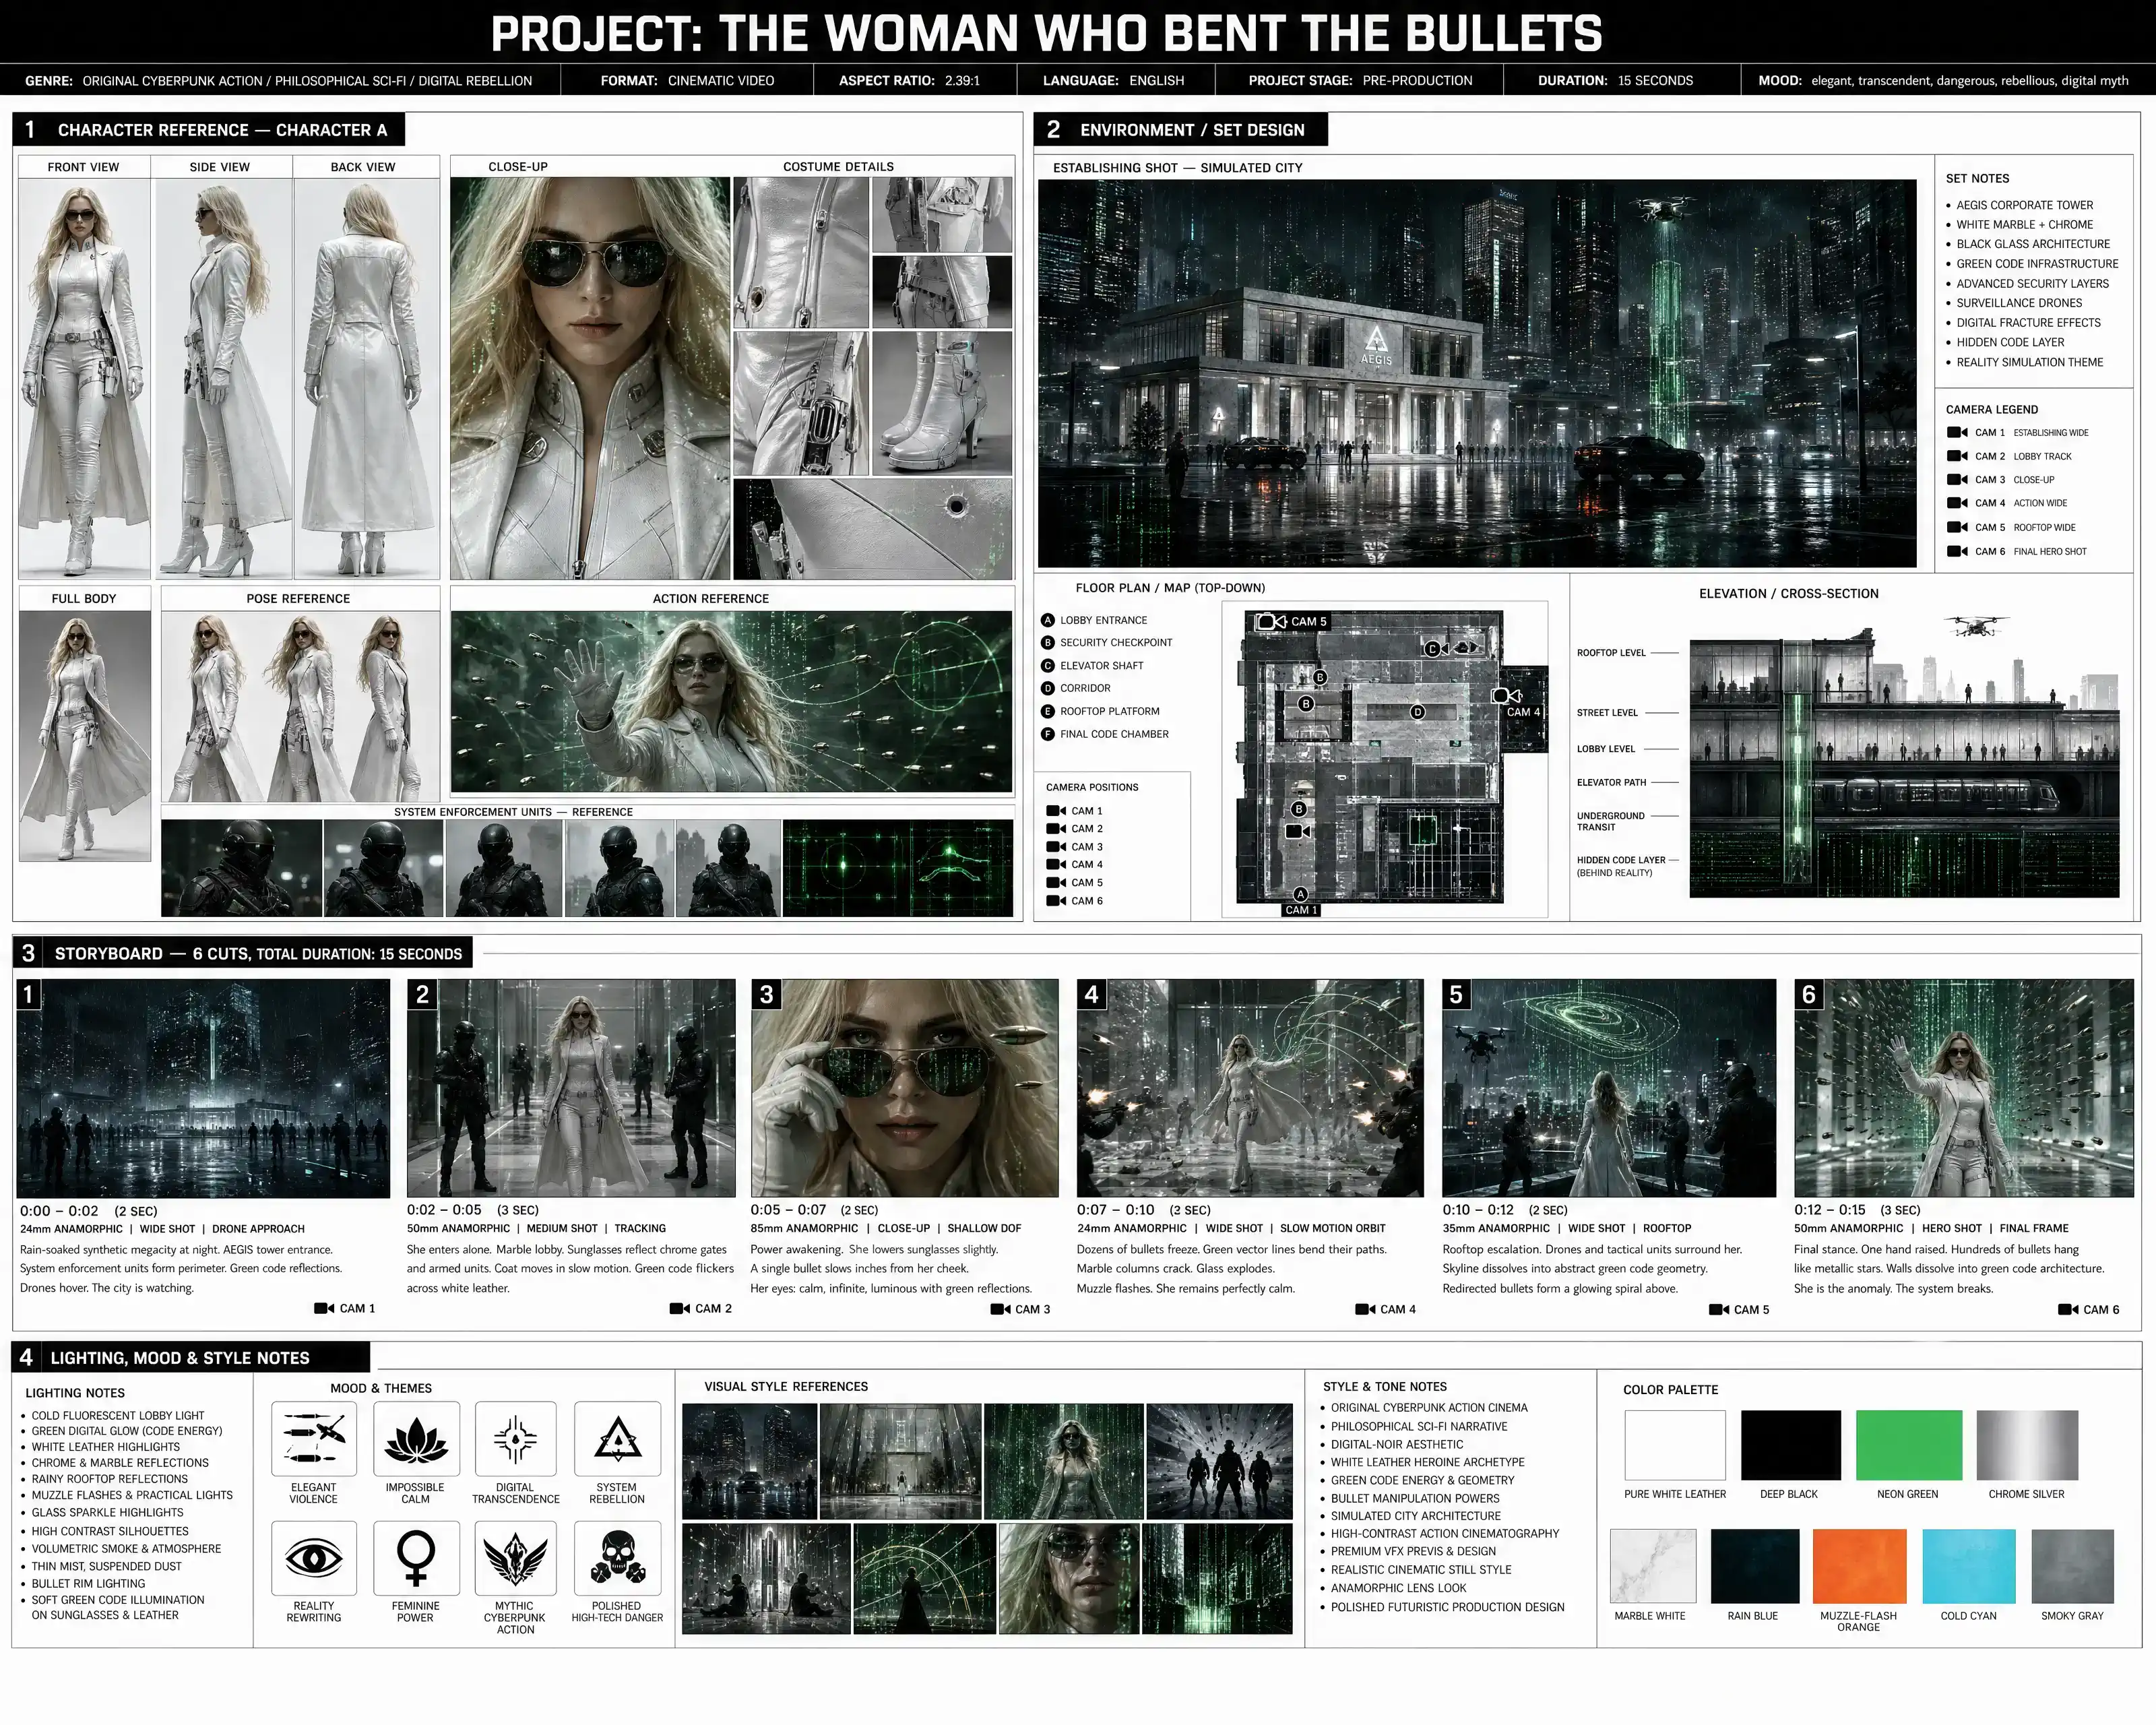
You can ask it to create a full cinematic pre-production board with multiple sections. That board can show your main character from the front, side, back, close-up, full body, costume details, pose reference, and action reference.
It can also show the environment, set design, camera icons, lighting notes, color swatches, and storyboard frames.
This is much more useful than a single concept image.
Then Seedance 2.0 acts like your AI video director.
It reads the storyboard as a visual reference and turns the planned shots into motion.
When the workflow works well, the final video feels less random. It feels more like a short movie trailer.
This is why the AI cinematic storyboard workflow GPT Image 2 Seedance 2.0 is especially powerful for creators, marketers, indie filmmakers, game designers, and AI video experimenters.
GPT Image 2 Storyboard Prompt Template
The most important part of this workflow is the storyboard prompt.
Do not ask GPT Image 2 to create a single poster.
Ask it to create a complete cinematic production planning board.
Here is a practical template you can use.
Create a professional cinematic pre-production storyboard board for a complete video concept.

Core Intent:
The final image should look like a full AI-generated video planning board where the character, environment, storyboard, scene flow, lighting, camera plan, color palette, and visual style are all generated together. It should feel ready to turn into a full cinematic video, with no extra prompt writing, no manual planning, and no creative block.

Project Theme:
[Describe your theme, for example: a futuristic woman discovering an alien ship in a glowing mangrove swamp / an ancient Roman gladiator battle inside the Colosseum / a lone cowboy crossing a golden desert canyon / a cyberpunk detective chasing a robot through a neon city]

Main Title:
PROJECT: [Your project title]

Top Metadata Bar:
Include a black cinematic header bar with small technical labels:
GENRE: [SCIENCE FICTION / ACTION THRILLER / FANTASY / ADVENTURE / HISTORICAL EPIC]
FORMAT: CINEMATIC VIDEO
ASPECT RATIO: 2.39:1
LANGUAGE: ENGLISH
PROJECT STAGE: PRE-PRODUCTION
MOOD: cinematic, dramatic, mysterious, intense, hopeful

Overall Layout:
A clean professional film production board, divided into four major numbered sections. Use black title bars, thin gray grid lines, white or light gray background, editorial layout, small technical annotations, camera labels, numbered storyboard frames, color swatches, mood badges, and film production design notes. The image should look like a real movie pitch deck, director treatment, or storyboard planning sheet.

1. CHARACTER REFERENCE — CHARACTER A:
Create a full character reference section on the left side or upper-left area.

Character Description:
[Describe the main character.]

Show multiple panels of the same character:
- FRONT VIEW
- SIDE VIEW
- BACK VIEW
- CLOSE-UP
- FULL BODY
- COSTUME DETAILS
- POSE REFERENCE
- ACTION REFERENCE

The character must remain consistent across all panels: same face, same outfit, same body proportions, same hairstyle, same costume details.

Character Mood:
[calm but determined / heroic and battle-worn / curious and frightened / elegant and mysterious / intense and focused]

2. ENVIRONMENT / SET DESIGN:
Create a detailed environment and set design section on the right side or upper-right area.

Environment Description:
[Describe the environment.]

Include:
- One large cinematic establishing shot of the environment
- One top-down floor plan / map view
- One side elevation / profile view / cross-section
- Camera icons labeled CAM 1, CAM 2, CAM 3, CAM 4, CAM 5, CAM 6
- Small set notes and camera legend
- Important objects, entrances, exits, platforms, paths, light sources, architecture, natural elements, or props

Set Design Details:
[Describe the objects, architecture, paths, light sources, atmosphere, and props.]

Atmosphere:
[misty, wet, glowing, mysterious / dusty, brutal, golden, epic / rainy, neon, noir]

3. STORYBOARD — 6 CUTS, TOTAL DURATION: 15 SECONDS:
Create six cinematic storyboard panels arranged in a clean grid. Each panel must have a black number box in the top-left corner, a cinematic still image, a technical strip below it, and a short caption block.

Each storyboard frame should look like a real cinematic shot from the same video. Keep the same character, same environment, same color grading, and same visual style across all six panels.

Panel 1:
Wide establishing shot.
Scene: [Opening scene]
Camera: 24mm anamorphic, wide shot, slow dolly or drone fly
Timecode: 0:00–0:02

Panel 2:
Medium character introduction.
Scene: [Character introduction scene]
Camera: 50mm anamorphic, medium shot, static or slow push-in
Timecode: 0:02–0:05

Panel 3:
Close-up emotional / discovery moment.
Scene: [Close-up discovery scene]
Camera: 85mm anamorphic, close-up, push-in, shallow depth of field
Timecode: 0:05–0:07

Panel 4:
Dynamic action or turning point.
Scene: [Action or turning point]
Camera: 24mm drone shot, overhead or dynamic tracking
Timecode: 0:07–0:10

Panel 5:
Large-scale transition / suspense moment.
Scene: [Suspense or reveal scene]
Camera: 35mm anamorphic, full-body shot, tracking shot
Timecode: 0:10–0:12

Panel 6:
Final dramatic encounter / hero shot.
Scene: [Final hero shot]
Camera: 50mm anamorphic, two-shot, static or slow push-in
Timecode: 0:12–0:15

4. LIGHTING, MOOD & STYLE NOTES:
Create a bottom section with production notes, color palette, mood badges, style references, and small visual thumbnails.

Lighting Approach:
[Describe the lighting.]

Mood & Atmosphere:
[Describe the emotional tone.]

Style / Look:
[Describe the cinematic style.]

Color Palette:
Show color swatches matching the scene.

Technical Visual Requirements:
Ultra-detailed, high-resolution, sharp editorial layout, clean grid design, professional pre-production board, realistic cinematic stills, consistent character design, consistent environment design, readable section structure, dramatic lighting, volumetric atmosphere, anamorphic lens, 2.39:1 frame panels, shallow depth of field, film grain, realistic shadows, premium movie concept art, polished VFX previs sheet.

Important:
Do not create a single movie poster. Create a complete cinematic production planning board with multiple sections, multiple panels, technical labels, storyboard frames, camera diagrams, color swatches, lighting notes, mood tags, and visual references.
You can paste this template into a GPT Image 2 Generator, replace the bracketed sections with your own idea, and generate a full storyboard board for your video.
Why This Prompt Template Works
This template works because it forces the image model to think like a production designer.
A normal image prompt might create one beautiful frame.
This prompt creates a full visual system.
That system includes four key parts:
- Character reference
- Environment design
- Six-shot storyboard
- Lighting and style notes
These four sections are extremely useful for video generation.
The character reference helps keep the main character consistent.
The environment design helps the scene stay in the same world.
The six storyboard cuts give Seedance 2.0 a clear shot sequence.
The lighting and style notes help preserve the cinematic look.
This is why the workflow is not just “image to video.”
It is closer to a real pre-production pipeline.
You are building the plan before generating the final video.
How to Make Cinematic Storyboard Video with GPT Image 2 and Seedance 2.0
Here is the full step-by-step tutorial.
Step 1: Choose a Clear Cinematic Concept
Start with a simple idea.
A 15-second video does not need a complex story. It needs a strong visual hook.
Good concepts include:
- A futuristic explorer discovering a hidden alien ship
- A cyberpunk detective chasing a robot through a rainy neon city
- A lone cowboy crossing a golden desert canyon
- A warrior entering an ancient arena
- A fashion model walking through a luxury city street at night
- A scientist opening a glowing portal in a dark laboratory
The best concept usually has:
- One main character
- One clear environment
- One dramatic action
- One final reveal
Do not try to tell a full movie in 15 seconds.
Create a mini trailer moment.
Step 2: Fill in the GPT Image 2 Storyboard Template
Now take the template and replace the placeholders.
Be specific.
Instead of writing:
A woman in a sci-fi place
Write:
A young blonde female scientist in a sleek white futuristic exploration suit stands on a wet wooden platform in a glowing blue mangrove swamp at night, looking at a massive alien spacecraft hidden in the mist.
Specific details help GPT Image 2 create a stronger storyboard.
Use clear descriptions for:
- Character
- Costume
- Environment
- Lighting
- Mood
- Color palette
- Action
- Final hero shot
Then generate the storyboard with a GPT Image 2 AI Image Generator.
Step 3: Check the Storyboard Before Making the Video
Before uploading the storyboard into Seedance 2.0, review it carefully.
Ask yourself:
- Does the character stay consistent?
- Does the environment make sense?
- Are the six cuts clear?
- Is there a strong beginning, middle, and ending?
- Does the final panel feel cinematic?
- Is the image a production board, not just a poster?
- Are there enough camera and lighting cues?
- Is the visual style consistent?
This step is important.
If your storyboard is confusing, your video will probably be confusing too.
A strong storyboard gives Seedance 2.0 a better visual reference.

Step 4: Upload the Storyboard to Seedance 2.0
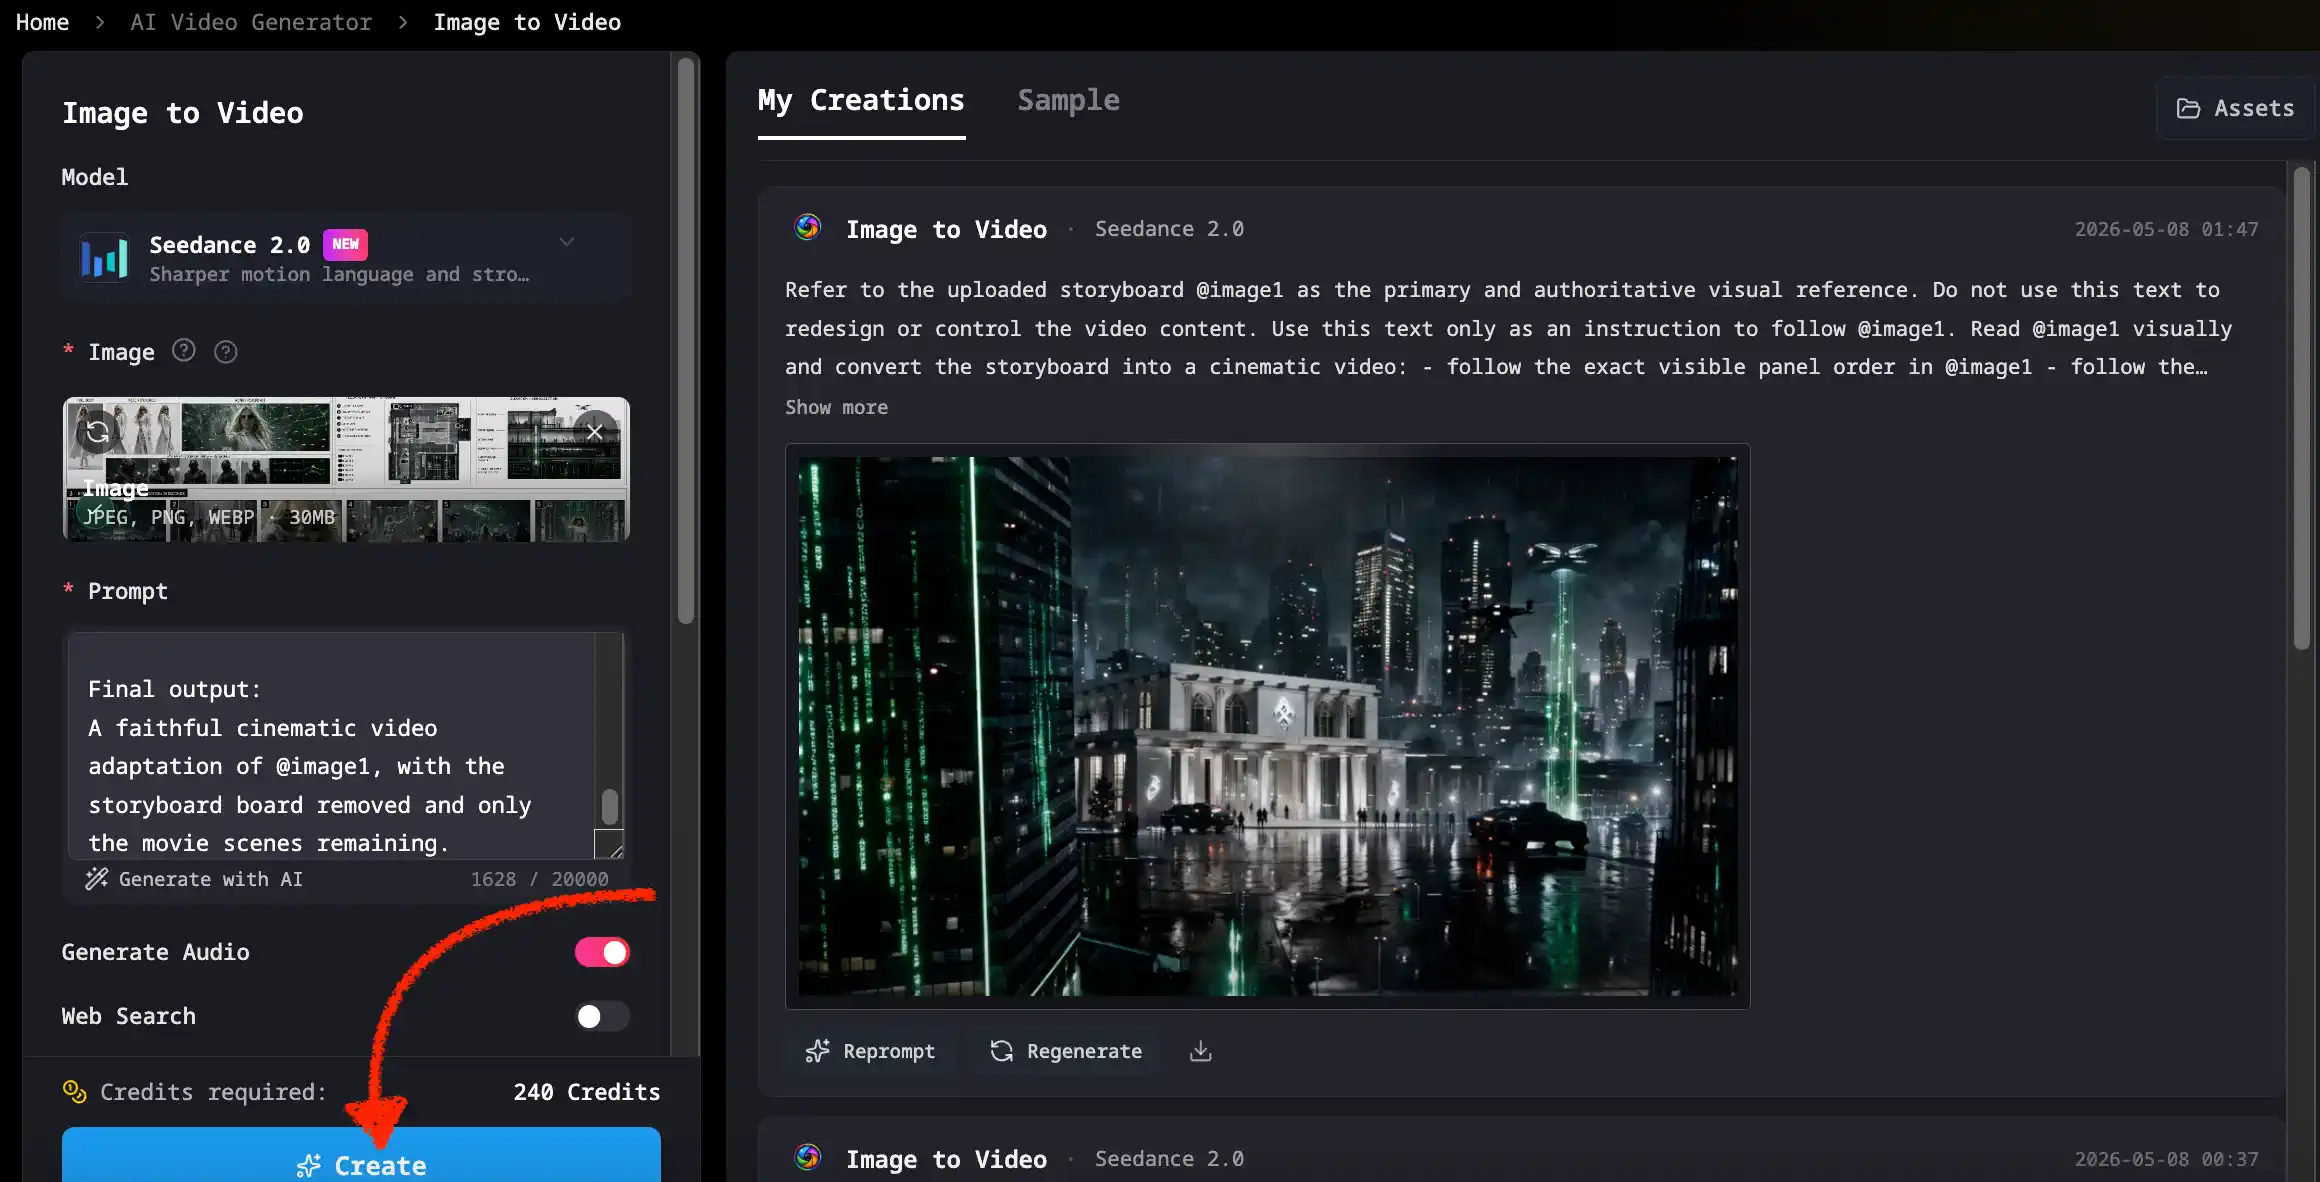
After your storyboard is ready, upload it into a Seedance 2.0 AI Video Generator.
This is where the workflow changes from image planning to video generation.
At this point, you do not need to write a huge new prompt.
The storyboard already contains most of the information.
Your Seedance 2.0 prompt should tell the model to follow the board, preserve consistency, and animate the six cuts.
Step 5: Use This Seedance 2.0 Prompt
Use this video prompt after uploading your GPT Image 2 storyboard.
Use the uploaded GPT Image 2 storyboard as the exact visual reference.

Create a cinematic 15-second video based on this storyboard. Follow the six cuts in order, including the character reference, environment design, camera plan, lighting style, color palette, mood, and shot timing.

Keep the main character visually consistent across all shots. Preserve the same outfit, face, hairstyle, body proportions, costume details, and cinematic mood.

Follow the storyboard timing:
Cut 1: 0:00–0:02
Cut 2: 0:02–0:05
Cut 3: 0:05–0:07
Cut 4: 0:07–0:10
Cut 5: 0:10–0:12
Cut 6: 0:12–0:15

Use smooth cinematic transitions, realistic camera movement, atmospheric lighting, natural motion, subtle motion blur, film grain, and trailer-style pacing.

No text on screen. No subtitles. No logos. No extra characters unless shown in the storyboard.

Style:
Hollywood-style cinematic trailer, realistic, high detail, dramatic lighting, immersive atmosphere, professional film look, 15 seconds.
This prompt is intentionally simple.
The goal is not to override the storyboard.
The goal is to make Seedance 2.0 follow it.
Example: GPT Image 2 Storyboard to Seedance 2.0 15-Second Movie Trailer
Let’s say you want to create a 15-second sci-fi trailer.
Your concept:
A futuristic woman discovers an alien ship hidden inside a glowing mangrove swamp.
Your GPT Image 2 storyboard should show:
- The woman’s character reference
- Her futuristic exploration suit
- The glowing swamp environment
- The alien ship hidden in mist
- Six cinematic cuts
- Camera notes
- Lighting notes
- Color palette
- Final dramatic encounter
Then your Seedance 2.0 video should follow this sequence:
- 0:00–0:02: Wide shot of the glowing swamp
- 0:02–0:05: The woman studies a holographic map
- 0:05–0:07: Close-up of blue light reflecting in her eyes
- 0:07–0:10: The alien ship descends through the mist
- 0:10–0:12: The ship door opens
- 0:12–0:15: The woman faces the mysterious figure in the light
This is a simple structure, but it feels cinematic because every shot has a purpose.
That is the power of GPT Image 2 storyboard to Seedance 2.0 15-second movie trailer generation.
Best Use Cases for This AI Cinematic Storyboard Workflow
This workflow is useful for many types of creators.
AI Movie Trailer Concepts
If you want to create short cinematic trailers, this is one of the best workflows.
You can generate a complete visual direction first, then turn it into a video.
This is useful for sci-fi, fantasy, action, horror, adventure, cyberpunk, historical drama, and mystery concepts.
TikTok, Reels, and YouTube Shorts
Short-form platforms reward strong visuals.
A 15-second cinematic trailer can work well because it has fast pacing, a strong hook, and a memorable ending.
The storyboard-first workflow helps you create videos that feel more intentional than random AI clips.
Game Concept Trailers
Game designers can use this workflow to test visual ideas.
You can create a character, world, camera style, and action scene before building a real trailer.
This is useful for concept pitches, mood tests, and early visual development.
Product Teaser Videos
You can also use this workflow for product videos.
For example, you can create a cinematic storyboard for:
- A futuristic phone launch
- A luxury perfume teaser
- A new AI app reveal
- A fashion campaign
- A tech startup promo
The same method works: storyboard first, video second.
Fashion Film and Music Video Concepts
This workflow is also strong for style-driven videos.
If your video depends on mood, lighting, clothing, and visual rhythm, a storyboard board gives the video model clearer direction.
Fashion films, music visuals, and luxury brand clips can all benefit from this approach.
Common Mistakes When Using GPT Image 2 + Seedance 2.0
Mistake 1: Creating a Poster Instead of a Storyboard Board
This is the most common mistake.
A poster may look beautiful, but it does not provide enough information for a video.
A storyboard board gives Seedance 2.0 more structure.
Make sure your GPT Image 2 prompt says:
Do not create a single movie poster. Create a complete cinematic production planning board.
This sentence matters.
Mistake 2: Making the Story Too Complicated
Do not try to fit too much story into 15 seconds.
Keep it simple.
One character. One world. One action. One reveal.
That is enough.
Mistake 3: Ignoring Character Consistency
Character consistency is one of the hardest parts of AI video.
That is why the character reference section is important.
Ask GPT Image 2 to show the same character from multiple views: front, side, back, close-up, full body, costume details, pose reference, and action reference.
This gives Seedance 2.0 a better chance of preserving the character.
Mistake 4: Giving Seedance 2.0 a Conflicting Prompt
After uploading the storyboard, do not write a totally different video prompt.
If the storyboard shows a desert warrior, do not ask Seedance 2.0 to create a cyberpunk hacker.
The prompt should reinforce the storyboard.
Let the visual board lead the video.
Mistake 5: Adding Too Much Text Inside the Storyboard
Small labels are fine.
But too much text can make the board messy.
The storyboard should be visually clear.
Seedance 2.0 needs strong images more than long notes inside the image.
Pro Tips for Better Hollywood-Style Storyboards with GPT Image 2 + Seedance 2.0
Use Six Cuts for a 15-Second Video
Six cuts are usually enough for a short cinematic trailer.
Each cut has a role:
- Cut 1: Establish the world
- Cut 2: Introduce the character
- Cut 3: Show emotion or discovery
- Cut 4: Trigger the action
- Cut 5: Build suspense
- Cut 6: End with a hero shot
This structure is simple, but powerful.
Make the First Frame Visually Strong
The first frame should immediately tell the viewer what world they are entering.
A weak first frame makes the video feel forgettable.
Use a wide establishing shot with strong lighting, atmosphere, and environment design.
Use Real Camera Language
Camera language helps AI models understand cinematic intent.
Use terms like:
- 24mm anamorphic wide shot
- 50mm medium shot
- 85mm close-up
- slow dolly
- drone fly
- tracking shot
- low angle
- shallow depth of field
- final hero shot
These details make your storyboard feel more like a real film plan.
Keep the Main Character Simple but Memorable
A strong character does not need too many details.
Use a clear silhouette and a few iconic visual elements.
For example:
- white futuristic suit
- black sunglasses
- bronze armor
- long red coat
- glowing jacket
- cowboy hat
- silver robotic arm
Simple visual identity is easier to preserve across images and video.
Build Around One Dramatic Action or Reveal
A short video needs one main moment.
Examples:
- The alien ship appears
- The robot wakes up
- The warrior enters the arena
- The detective sees the hidden clue
- The portal opens
- The city lights shut down
- The hero turns toward the camera
One strong reveal is better than five weak ideas.
FAQ
What is the GPT Image 2 + Seedance 2.0 storyboard to video workflow?
It is a workflow where you use GPT Image 2 to create a cinematic storyboard board, then upload that storyboard into Seedance 2.0 to generate a short cinematic video. The storyboard acts as the visual plan, and Seedance 2.0 turns it into motion.
How to make cinematic storyboard video with GPT Image 2 and Seedance 2.0?
First, use a GPT Image 2 Generator to create a professional pre-production storyboard board. Then upload the storyboard to a Seedance 2.0 AI Video Generator. Use a prompt that tells Seedance 2.0 to follow the six cuts, character reference, environment, lighting, camera plan, and timing.
Can I create a 15-second movie trailer with GPT Image 2 and Seedance 2.0?
Yes. This workflow is especially useful for 15-second cinematic trailers. You can create six storyboard cuts, assign each cut a timecode, and then ask Seedance 2.0 to animate the sequence.
Why should I use GPT Image 2 before Seedance 2.0?
Because GPT Image 2 helps you create the visual plan first. This gives Seedance 2.0 a stronger reference for character consistency, environment design, camera movement, lighting, and mood.
What prompt should I use in Seedance 2.0 after uploading the storyboard?
Use a short prompt that tells Seedance 2.0 to follow the uploaded storyboard exactly. Mention the six cuts, character consistency, camera movement, lighting style, color palette, and 15-second timing.
Is this workflow good for YouTube Shorts, TikTok, and Reels?
Yes. The 15-second cinematic structure works well for short-form platforms because it creates a fast, visual, trailer-like experience.
Can I use this workflow for commercial AI videos?
Yes, but you should create original characters, original worlds, and original visual concepts. Avoid copyrighted characters, protected logos, celebrity likenesses, and direct copies of famous movie scenes.
The Bottom Line
The GPT Image 2 + Seedance 2.0 workflow gives creators a better way to make cinematic AI videos.
Instead of starting with a vague video prompt, you start with a clear visual plan.
GPT Image 2 helps you create the storyboard.
Seedance 2.0 helps you turn that storyboard into motion.
This is why the GPT Image 2 + Seedance 2.0 storyboard to video workflow is so useful for AI movie trailers, short-form videos, product teasers, game concepts, fashion films, and cinematic experiments.
The best part is that the workflow is simple:
Create the board.
Upload the board.
Animate the board.
If you want to try it yourself, start by creating a storyboard with the GPT Image 2 AI Image Generator, then turn it into a cinematic video with the Seedance 2.0 AI Video Generator.
Start with one character, one environment, one dramatic action, and one final hero shot.
That is enough to create a cinematic AI video that feels planned, polished, and ready to share.